Now that we’ve covered installing Windows, it’s time to look at the other major player in modern IT environments: Linux.
Unlike Windows, Linux comes in many different flavors known as distributions (or “distros”). While there are hundreds of options available each with its own pros and cons we’ll focus on the most popular desktop distribution for general use: Ubuntu.
1. Preparing the Installation Media
Because Ubuntu is open-source, you can download a free operating system image directly from the official website. However, simply dragging and dropping the installation file onto a flash drive won’t work. It must be prepared so your system’s BIOS/UEFI can recognize it as a bootable device.
Pro Tip: Use a dedicated imaging tool like BalenaEtcher or Rufus to write the downloaded
.isofile to your USB flash drive and make it bootable.
2. Running the Ubuntu Installer
- Boot from USB: Insert your bootable flash drive into the target computer, power it on, and access your system’s boot menu to select the USB drive.
- Try vs. Install: Upon loading, Ubuntu gives you two choices: Try Ubuntu (run directly from the USB) or Install Ubuntu. Select Install Ubuntu for a clean, permanent setup.
- Configuration Defaults: For a standard setup, you can proceed through the initial language and keyboard options using the recommended defaults.
3. Setting Up Users and Hostnames
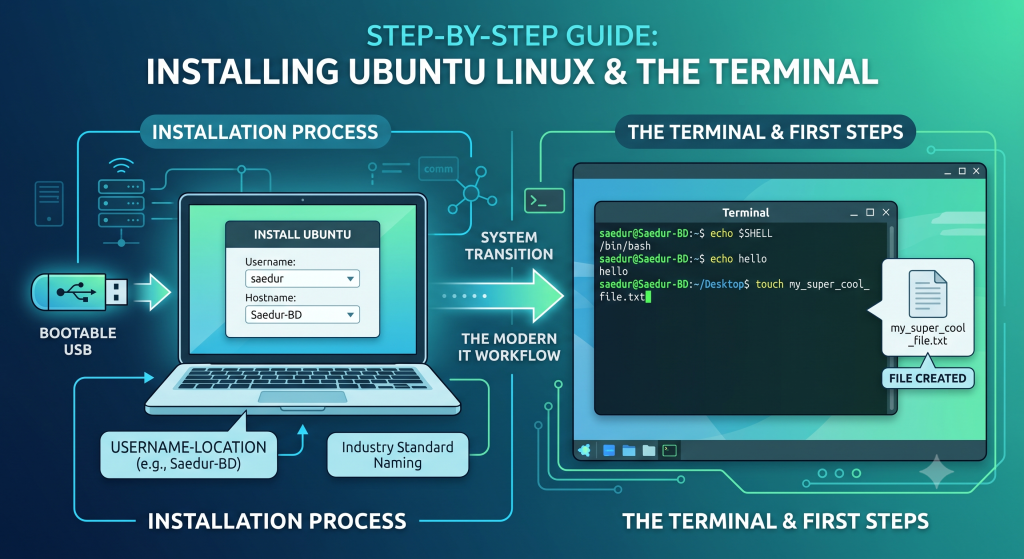
During installation, you will be prompted to enter your user details and a host name (computer name).
Plaintext
[ Name ]         --> Saedur
[ Hostname ]     --> Saedur-BD
[ Username ]     --> saedur
[ Password ]     --> ********
IT Best Practice: Hostname Naming Conventions
In a personal setup, using your own name as the computer’s hostname is standard. However, in an enterprise IT environment, hostnames follow strict naming conventions to keep assets organized. A common industry standard format is:
$$\text{Username} – \text{Location}$$
Example: Saedur-BD indicates the user and the primary office location Bangladesh).
Once you finish entering your credentials, complete the installer prompts and reboot the system when prompted. Remove the USB drive so the system boots into your new installation.
4. Exploring the Ubuntu Desktop Environment
After logging in, you’ll land on the main desktop interface:
- The App Dock (Left): Contains shortcuts to your favorite applications, browser, and file manager.
- Top Right Status Bar: Provides quick access to network connections, Bluetooth, audio settings, and power options (Restart, Sleep, Shutdown, Log Out).
- System Settings: Accessible from the power menu; allows you to adjust screen resolution, display options, and hardware preferences.
- Files Utility: Clicking the Files icon opens the file explorer. Navigating to the Computer view reveals the root directory structure of the Linux file system.
5. Getting Started with the Terminal (Bash)
While navigating the graphical user interface (GUI) is straightforward, mastering the command-line interface (CLI) is essential for any IT professional working with Linux.
Opening the Terminal
- Open the search utility (or press the
Superkey). - Search for Terminal and open it.
When the terminal loads, you’ll see a command prompt formatted like this:
Bash
saedur@Saedur-BD:~/Desktop$
This prompt provides critical context at a glance:
saedur: The currently logged-in user.Saedur-BD: The hostname of the machine.~/Desktop: Your current working directory on the filesystem.
Basic Shell Commands
1. Verify Your Shell Environment
To confirm that you are running the Bash (Bourne Again Shell) environment, use the echo command to print the $SHELL environment variable:
Bash
echo $SHELL
# Output: /bin/bash
(The echo command simply outputs whatever string or variable argument you pass to it, such as running echo hello.)
2. Create a File via Command Line
To create a quick, empty file on your desktop directly from the shell, use the touch command:
Bash
touch my_super_cool_file.txt
You will immediately see the new file appear on your graphical desktop.
Final Thoughts
It might seem faster to use a point-and-click GUI like Windows at first, but command-line proficiency is non-negotiable for system administration, server management, and automation in Linux environments. Learning these foundational commands is your first step toward mastering Linux!